

Many Salesforce orgs have the same quiet problem: a handful of record-triggered flows on Opportunity or Case that fire on every save, update the same record twice and run in an order nobody chose. Users feel it as slow saves, admins feel it as "who changed this field?" tickets. These record-triggered flow best practices fix most of it with settings you already have, no code required.
This guide is for admins and ops leads who own automation on Sales Cloud or Service Cloud. Each tip comes with concrete steps you can apply this week.
Tip 1: Use fast field updates for same-record changes
When you build a record-triggered flow, the Start element asks you to optimize for Fast Field Updates or Actions and Related Records. The choice matters more than it looks.
- Fast Field Updates (before save): runs before the record is written to the database. It can change fields on the triggering record and show custom errors. Trailhead describes it as optimal performance because the database is minimally affected (get started with triggered flows).
- Actions and Related Records (after save): runs once the record is saved. Use it to create, update or delete other records, call subflows, or send email alerts.
Salesforce's architects are explicit: same-record field updates belong in before-save automation, not in after-save flows, because before-save logic changes values in memory and skips an extra save. Their trigger automation decision guide also notes a limit to plan for: before-save flows cannot call subflows or invocable Apex.
Before / after in practice:
- Before: an after-save flow on Opportunity uses an Update Records element to set a "Region" field on the same record, which forces a second save.
- After: the same logic moves to a Fast Field Updates flow and uses an Assignment element on the triggering record. One save, no recursion.
Tip 2: Make entry conditions do the filtering
The cheapest flow run is the one that never starts. Entry conditions in the Start element decide whether the flow runs at all, and the Salesforce Admins blog recommends setting them so records that do not match never enter the flow.
For flows that run on update, pay attention to the second setting. Choosing Only when a record is updated to meet the condition requirements means the flow runs when a record moves from not matching to matching, not on every later edit. Trailhead's build a record-triggered flow unit uses it to create a contract once when an opportunity is won, instead of on every following save.
Quick checklist for each flow:
- Is the trigger as narrow as possible (created only, updated only, or both)?
- Do entry conditions filter on the field values that really matter (stage, status, record type)?
- For update triggers, should the flow run only when the record first meets the conditions?
- Is any Decision element right after Start doing work that entry conditions could do instead?

If you are mapping several flows on the same object, sketch the logic on a whiteboard first: which field changes start which flow, and which flows touch the same fields. Overlaps show up quickly on paper.
Tip 3: Control the run order with Flow Trigger Explorer
When three flows run on the same object and event, their order changes the result. Flow Trigger Explorer shows every record-triggered flow for a chosen object and trigger, grouped by when it runs: before save, after save, asynchronously or on a schedule (meet Flow Trigger Explorer).
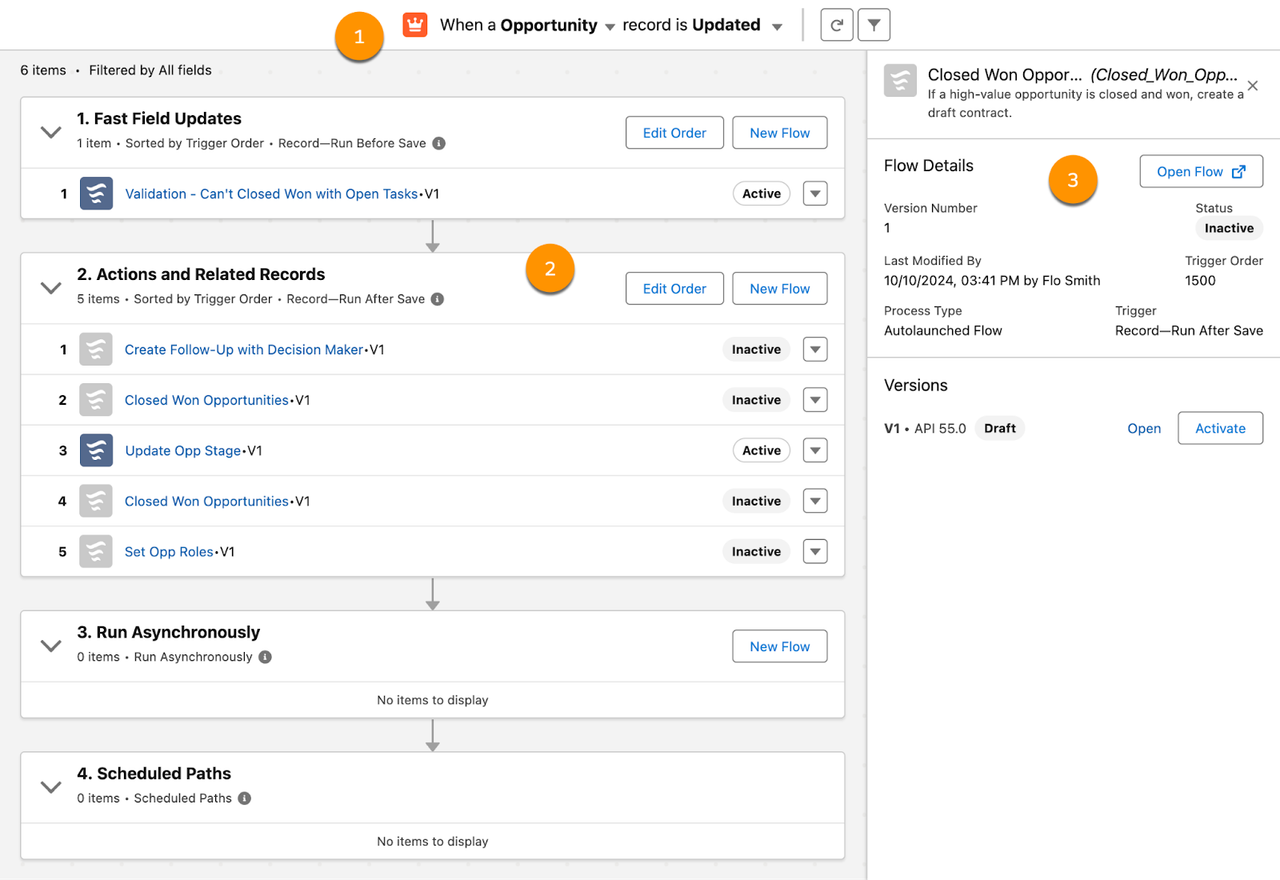
How to open it and set the order:
- From Setup, go to Flows and click Flow Trigger Explorer next to New Flow. You can also open it from a flow's Start element or from Object Manager under Flow Triggers.
- Pick the object and the trigger (created, updated or deleted).
- Review each group. Note that the order inside the asynchronous group is not guaranteed.
- Click Edit Order, drag the flows into the right sequence, then click Update.
When you set trigger order values in flow properties, leave gaps such as 10, 20, 30. The architects' guide recommends it so you can insert a new flow later without renumbering everything.
Tip 4: Decide how many flows per object, then stick to it
There is no single right number. Salesforce's architect guidance says that consolidating everything into one flow per object does not have a major impact on performance, and that trigger ordering makes splitting flows manageable. What hurts is inconsistency.
Choose one flow per object and trigger if:
- One admin owns the object and changes are infrequent.
- The logic is short and easy to read in one canvas.
Choose several smaller flows if:
- Different teams (sales ops, service ops) own different rules on the same object.
- You want to activate, test or roll back one rule without touching the others.
Either way, keep one object's automation mostly in one tool. The architects' guide suggests picking Apex or Flow per object for easier debugging, while still allowing flows to call invocable Apex for complex logic.
Tip 5: Debug as the real user and watch scheduled paths
Many "the flow works for me" tickets are permission problems. In Process Automation Settings, enable Let admins debug flows as other users, then use Run flow as another user in the Debug window. The Admins blog shows how this exposes field-level security, permission set and sharing issues before users do.
Scheduled paths deserve the same care. The same article warns that long waits raise the failure risk: a scheduled path fails if the triggering user is deactivated or if the limit on waiting interviews is reached. Prefer short delays and document who owns each scheduled flow. For what to do when a flow does fail, see our guide to Salesforce Flow error handling with fault paths.
What to do now: a one-hour record-triggered flow review
- List the record-triggered flows on your two busiest objects (usually Opportunity and Case) in Flow Trigger Explorer.
- Move any after-save flow that only updates the triggering record to Fast Field Updates.
- Tighten entry conditions and switch update flows to "only when updated to meet the conditions" where the action should happen once.
- Order the flows with gaps (10, 20, 30) and write the order down in the flow descriptions.
- Test as a real sales or service user with debug-as-user, then deploy.
- Check the combination of flows and validation rules on the same object: if a rule depends on a field that a flow sets, test both together. Our Salesforce validation rules tips cover how to keep rules readable.
Conclusion
Record-triggered flows are the backbone of automation on Salesforce, and small settings decide whether they stay fast and predictable. Before-save for same-record updates, strict entry conditions, an explicit run order and testing as real users will remove most slow saves and surprise field changes.
If your org has grown a tangle of flows on Sales Cloud or Service Cloud, ASC Digital can review your automation and help you consolidate it into a clean, documented design.